 06 Feb 2011
  Matteo Mattei
  mysql php
For my client I needed to create a PHP script that can export a full MySQL database schema in another database. This script also need to keep and set constraints.
You only need to configure $DB_SRC_* and $DB_DST_* variables to fit your environment.
Here below you can find the code I created for this purpose:
Update 2016-10-14: The code below has been rewritten using PHP mysqli driver (thanks to Richard Maurer).
04 Feb 2011 Matteo Mattei linux ftp virtual vsftp  I am usually to configure vsftp on web servers to allow FTP access based on domains. Few days ago my client asked me to create multiple FTP users for a single domain every one with a different root folder into that domain.
This is my usual configuration of my /etc/vsftpd.conf
listen=YES
anonymous_enable=NO
local_enable=YES
virtual_use_local_privs=YES
write_enable=YES
connect_from_port_20=YES
xferlog_enable=YES
pam_service_name=vsftpd
guest_enable=YES
guest_username=www-data
user_sub_token=$USER
local_root=/var/www/$USER
chroot_local_user=YES
hide_ids=YES
force_dot_files=YES
ftpd_banner=Welcome to my private FTP service.
local_umask=022
and this is my /etc/pam.d/vsftpd
auth required pam_pwdfile.so pwdfile /etc/ftpd.passwd
account required pam_permit.so
The first time I have created the file /etc/ftpd.passwd in this way:
htpasswd -c -d -b /etc/ftpd.passwd domain1.com <password>
For the next users simply avoid the “-c” parameter:
htpasswd -d -b /etc/ftpd.passwd domain2.com <password>
With this simple configuration all users have these credentials:
- host: domain1.com
- username: domain1.com
- password: password
- port: 21
- Root folder: /var/www/domain1/
Now the point is: how can we create multiple users for a single domain each one with a different root folder? The answer is pretty simple, follow me!
Create the folder /var/www/users and add the following line at the end of /etc/vsftpd.conf
user_config_dir=/var/www/users
Inside the folder /var/www/users create a file for each virtual user (for example the user user1.domain1.com) containing a line with the root directory for that user:
echo "local_root=/var/www/domain1.com/pub/user1" > /var/www/users/user1.domain1.com
Now add the new user/password in /etc/ftpd.passwd as usual:
htpasswd -d -b /etc/ftpd.passwd user1.domain1.com <password>
Restart vsftpd server and test your new configuration!
12 Jan 2011 Matteo Mattei wordpress bluehost mail tricks In these days I spent a lot of time looking for a solution of changing the admin email address in Bluehost and I found a working solution! The problem is that Bluehost uses Exim as mail server that is configured to require a valid and registered email address.
This is my scenario:
- Some domains with mx record pointed to google apps (I will take myprivatedomain.com as example).
- No mailbox created on Bluehost because I have already created some mailboxes with google apps.
- myprivatedomain.com with info@myprivatedomain.com as admin email set in Settings -> General inside Bluehost panel.
At this point, every email sent from any comments has this header:
user <user@boxXXX.bluehost.com>
I want to change it in order to have this address in my comments:
info <info@myprivatedomain.com>
These are the steps to follow:
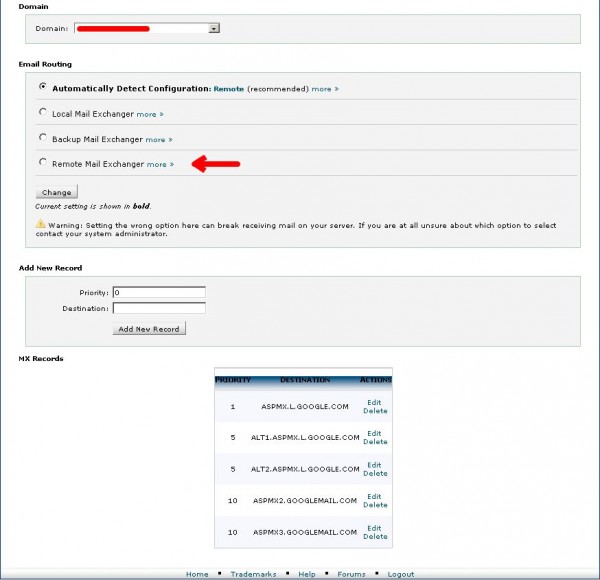
- Log-in to Bluehost cpanel and go to Mail -> MX Entry. Here select your host (myprivatedomain.com), add these MX records as in the picture below and make sure to set Remote Mail Exchanger:
- 1 ASPMX.L.GOOGLE.COM.
- 5 ALT1.ASPMX.L.GOOGLE.COM
- 5 ALT2.ASPMX.L.GOOGLE.COM
- 10 ASPMX2.GOOGLEMAIL.COM
- 10 ASPMX3.GOOGLEMAIL.COM
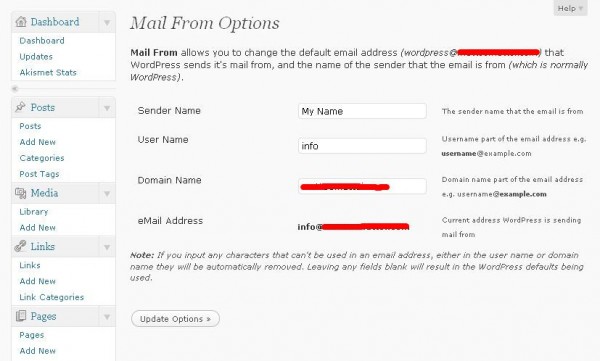
- Now the e-mail delivery should just work. However, if you want to change the “From email” field, install the mail from plugin and configure it in this way:
- Sender Name -> YourName
- User Name -> info
- Domain Name -> myprivatedomain.com
That’s all! Now try to post a comment and look at your mailbox.
Update 2013/11/02: As Amanda highlited in the comments below, it’s also necessary to add an account for each address set up in Google Apps. So, go to Bluehost’s cPanel > Email Accounts, then add an account for each address. Adding the addresses to your Bluehost accounts, even though they won’t actually work there, seems to make them trusted, and allows you to send with those addresses.
08 Jan 2011 Matteo Mattei linux archlinux usb Since some months the regions are sending the new electronic healt card to the house of the people. These cards are featured with a microchip. The goal to these cards is the same of the previous ones with in addition the possibility to be read by a smart card reader and store, if you want, your electronic healt records.
This let you enter in your region website and look all your medicines taken, your hospital recovers etc…
So let’s start! In this article I will show you how to use this card with the card-reader provided by the Hospital URP with Archlinux and more in general with Linux.
For who does not have the reader, I can suggest to buy the miniLector bit4id directly by the URP of the hospital in your zone because its price is fixed (in Italy) to 4,20 Euros instead of fifteen/twenty Euros that is sold elsewhere.
The first thing to do is to connect the bit4id reader to a free USB port of your pc and type lsusb in a terminal. You should obtain a line like this:
Bus 001 Device 003: ID 072f:90cc Advanced Card Systems, Ltd ACR38 SmartCard Reader
Now install the needing packages:
pacman -Sy ccid pcsclite pcsc-tools pcsc-perl
yaourt -Sy --aur libminilector38u-bit4id libasecnsp11
With root user run pcsc_scan, you should obtain a similar output:
[root@barracuda ~]# pcsc_scan
PC/SC device scanner
V 1.4.17 (c) 2001-2009, Ludovic Rousseau <ludovic.rousseau@free.fr>
Compiled with PC/SC lite version: 1.6.4
Scanning present readers...
0: ACS ACR 38U-CCID 00 00
Sat Jan  8 17:45:24 2011
  Reader 0: ACS ACR 38U-CCID 00 00
  Card state: Card inserted
  ATR: 3B DF 18 00 81 31 FE 7D 00 6B 15 0C 01 80 01 01 01 43 4E 53 10 31 80 F9
At this point you have to configure Firefox for authentication. Proceed in this way:
- Make sure the card reader is connected to the PC and the card is inserted
- Run Firefox and select Edit -> Preferences -> Advanced -> Encryption -> Security Devices
- Click on Load button and insert EuropeanHealtCard as description and /usr/lib/libaseCnsP11.so as path.
- To verify that all works correctly, try to open the link https://servizi.arubapec.it/crtest/showcert.php and insert your PIN.
If the authentication is passed, you should see a welcome message.
Now you only need to access to your electronic health records from your region website using your PIN provided during the card activation.
For a guide on configuring the European Healt card with Ubuntu take a look at Andrea Grandi’s blog.
For more informations on Linux and the European Healt Card look at Regione Toscana website.
28 Dec 2010 Matteo Mattei bash linux raid Sometimes it happens that, after a long time of usage, one disk is going to be damage and starts to give some troubles… What’s happened when the disk is part of a software raid? If the failing disk is only one, all data are safe but you have to replace the disk as soon as possible in order to avoid very ugly surprises! I know that is always a very frustrating thing to change a disk from a raid software.
However, when a disk in RAID 5 or in RIAD 1 should be replaced, you have to follow these steps:
- Take a look at /proc/mdstat, if is all ok (i.e. you have to replace a disk that contains some corrupted sectors but the raid is yet integer) mark the bad partition as failed (sdb1 in my case), otherwise continue from step 2:
```mdadm --manage /dev/md0 --fail /dev/sdb1```
-
Remove that partition from the Raid array: mdadm --manage /dev/md0 --remove /dev/sdb1
- Shutdown the pc, change the disk and power on the pc again.
- At this point if you type
cat /proc/mdstat you should see [U_U]. - Copy now the partition table from a working disk (sda) to the new inserted disk (sdb):
sfdisk -d /dev/sda | sfdisk /dev/sdb - Add the new partition to the array:
mdadm --manage /dev/md0 --add /dev/sdb1 - Done!
When you have finished, type
and wait for the array rebuild.
At the end of the process (that can takes also some hours, depending on the size of the partition) you should have all “U” ([UUU]).
28 Dec 2010 Matteo Mattei linux backup ldap The today question is: did you ever happened to make an hot backup of an LDAP database? I will show you how to do it creating an LDIF file and then doing the respective restore (in the hope you will not really need it). After all it is quite simple…
BACKUP:
ldapsearch -x -b "dc=example,dc=com" -h 192.168.0.1 -D "cn=manager,dc=example,dc=com" -w secret_password "(objectclass=*)" > backup_file.ldif
RESTORE:
The new database must be empty!
ldapadd -D "cn=manager,dc=example,dc=com" -x -w secret_password -h 192.168.0.1 -f backup_file.ldif
Here there is the meaning of the parameters used:
- -x specifies that you want to use the “sample authentication” (rather than SASL)
- -b “dc=example,dc=com” indicates the BaseDN of the server, thus the position where we want to copy all nodes and entries.
- -h 192.168.0.1 is the address of the remote LDAP server.
- -D “cn=manager,dc=example,dc=com” specifies the LDAP user that will bind to the remote server.
- -w secret lets you to specify the password for the user you have previously chosed.
- “(objectclass=*)” specify all entries in the database.
- backup_file.ldif is the file, in LDIF format, where the backup will be executed.